What’s Proxmox VE?
Proxmox Digital Atmosphere (Proxmox VE) is a free and open-source virtualization platform that permits you to unleash the facility of virtualization by operating a number of digital machines (VMs) on a single bodily machine. Constructed on the stable basis of Debian GNU/Linux, Proxmox VE gives a web-based interface for easy administration of your VMs.
After the acquisition of VMware by Broadcom, adjustments in licensing varieties, and companion applications, many companies are in search of reasonably priced VMware various options.
This weblog put up will information you to putting in Proxmox VE 8.1 on VMware Workstation 17. IT’s a improbable choice to experiment with Proxmox VE in a secure and managed surroundings earlier than deploying IT in a manufacturing surroundings.
By following this step-by-step information, you’ll be capable of:
- Set up Proxmox VE 8.1 on VMware Workstation 17
- Configure important settings to your Proxmox VE set up
We’ll assume you have already got VMware Workstation 17 put in in your system. So, let’s dive in and get your Proxmox VE journey began!
System Necessities for Proxmox VE 8.1
Earlier than we leap into the set up course of, making certain your system meets the minimal necessities to run Proxmox VE 8.1 easily inside VMware Workstation 17 is essential. Right here’s a breakdown of what you’ll want:
Really useful {Hardware} for Proxmox VE 8.1
- CPU: 64-bit structure (Intel EMT64 or AMD64) with virtualization extensions enabled (Intel VT or AMD-V)
- RAM: Minimal of two GB RAM (4 GB or extra really useful) for the Proxmox VE host itself, plus further reminiscence devoted for the VMs you intend to run.
- Storage: Ample cupboard space to accommodate the Proxmox VE set up and the digital machines you’ll create. Strong-state drives (SSDs) are really useful for optimum efficiency.
- Community Interface Card (NIC): One NIC is sufficient for primary performance, however a devoted community adapter for the host machine is really useful for higher community efficiency, particularly for those who plan to run VMs with network-intensive duties.
Additionally Learn: One other VMware Different: Apache Cloudstack
Really useful Software program
- Proxmox VE 8.1 ISO: Download Proxmox VE 8.1 ISO from the Proxmox web site.
- VMware Workstation 17: Guarantee you’ve a licensed copy of VMware Workstation 17 put in in your system.
Lab Setup for Proxmox VE 8.1
Earlier than we delve into the set up course of, let’s arrange our digital lab surroundings utilizing VMware Workstation 17. Right here, we’ll create a digital machine (VM) that can function the host for Proxmox VE 8.1.
Steps
Download Proxmox VE 8.1 ISO from the Proxmox web site.

Open VMware Workstation 17 in your system. I assume that you simply’ve already put in IT in your system. And, click on on “Create a New Digital Machine”.

Select the “Typical” possibility and click on “Subsequent” to proceed.

Choose “Workstation 17.x” from {Hardware} compatibility and click on “Subsequent”.

From the following window, select the downloaded Proxmox ISO picture and click on “Subsequent”.

Set the visitor working system as Linux and the model as Debian.

Title your digital machine and choose its location.

Enter the disk dimension, choose “Cut up digital disk into a number of recordsdata”, and click on “Subsequent”.

Evaluation the Information and click on “End” to finish the method.

Energy on the digital machine and through boot.

Select “Set up Proxmox VE graphical mode”, and click on Enter.

Learn and comply with the license settlement.

Choose the goal laborious disk and regulate the file system and laborious disk choices if wanted. Click on “Subsequent”.

Choose the Nation, and time zone, and click on Subsequent.

Set the admin password, affirm the password, and e mail handle, and click on Subsequent to proceed.

Set hostname (FQDN), IP handle, gateway, and DNS server, and click on Subsequent.

Confirm the Information and click on on Set up.

The set up course of will begin now. Look forward to a while to finish the method.

Accessing the Proxmox Server
After the reboot, you’ll be able to entry the Proxmox server through the online UI. For this, log in to your consumer pc. Enter the Proxmox server’s administration IP with Port 8006. Enter your username and password, and click on “Login”.

Congratulations! You have got efficiently accessed the Proxmox Administration console.
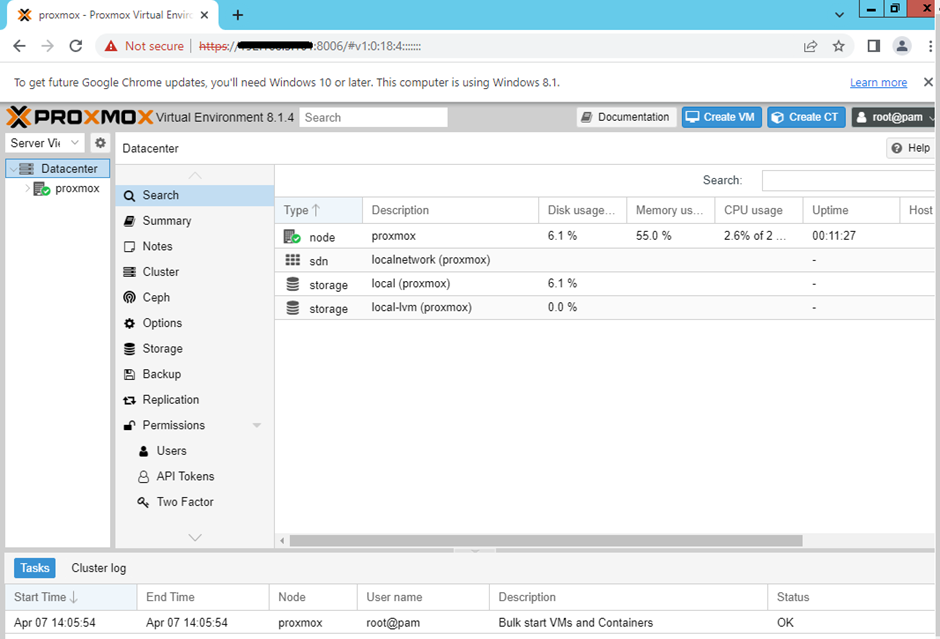
Now you’re able to discover the options and capabilities of Proxmox VE in your virtualized surroundings.
FAQs
What’s Proxmox VE?
Proxmox VE is an open-source virtualization platform that lets you handle your digital machines and containers with ease. IT supplies a variety of options and capabilities to your virtualized surroundings.
Can I set up Proxmox VE on VMware Workstation?
Sure, you’ll be able to set up Proxmox VE on the VMware Workstation for testing functions. IT lets you expertise the options and capabilities of Proxmox VE with out the necessity for bodily {hardware}.
How do I entry the Proxmox Administration console?
To entry the Proxmox Administration console, observe these steps:
- Log in to your consumer pc
- Enter the Proxmox server’s administration IP with Port 8006
- Enter your username and password
- Click on “Login”
Additionally Learn: Exploring OpenStack as a VMware Different: A Complete Information
Conclusion
There you’ve IT! A step-by-step information on putting in Proxmox VE 8.1 on VMware Workstation 17. Whether or not you’re a system administrator or a developer, Proxmox VE gives a robust virtualization platform to your virtualized surroundings. For those who discovered this tutorial useful, don’t neglect to love and subscribe for extra tech tutorials. Thanks for studying this put up and share IT in your social media channels for those who really feel price sharing IT. Completely satisfied studying!